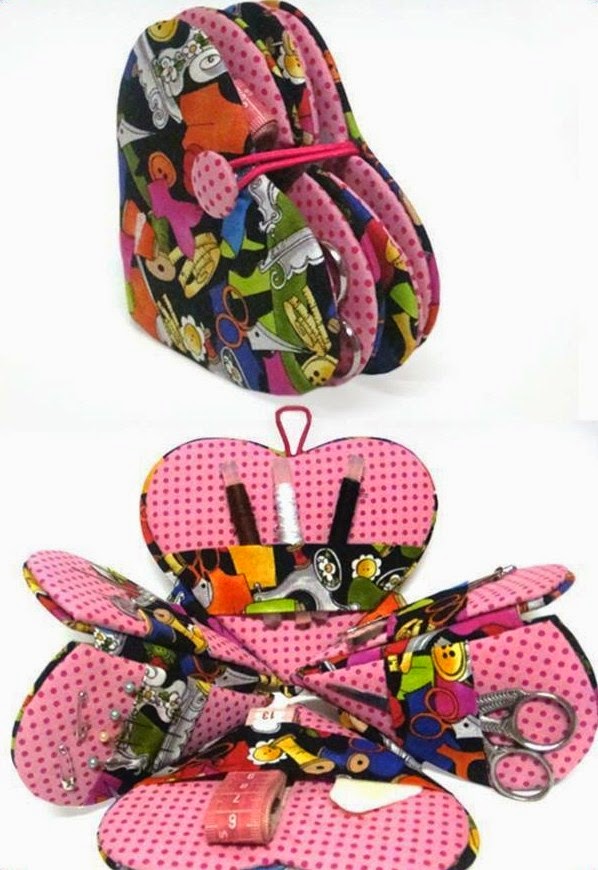
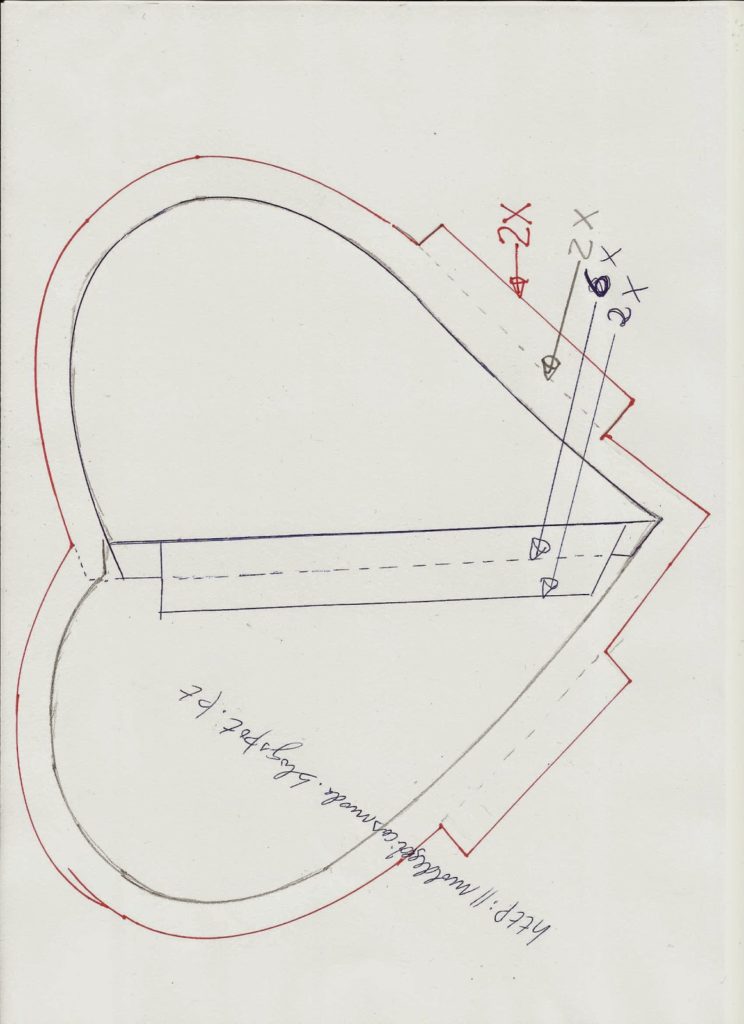
Sew For Kiddies
1.

2.

3.

4.

5.

6.

7. MOLD KIDS DRESS
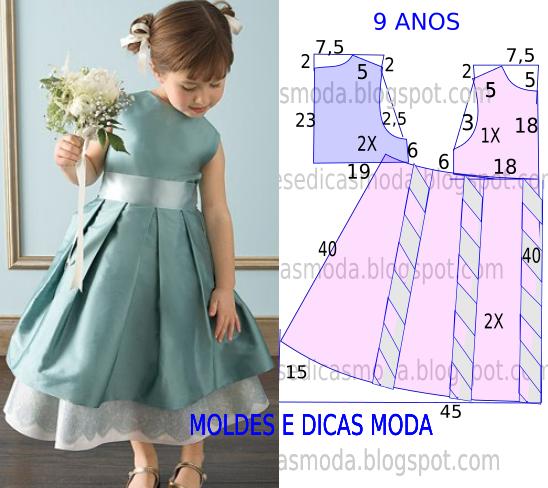
The dress mold child is in size 9 years. The illustration dress mold child has no value seam.
Cut a rectangle of fabric with the height and width you want for the back and trunk fronts.
Fold in half the rectangle of paper or fabric.
Draw the neck back.
Draw the neckline in front.
Draw the shoulder in dress mold .
Draw the width of the chest in the fronts and backs.
Draw the line of cava orientation.
Draw the cava in the fronts and backs.
Draw the dress trunk side.
Cut a rectangle of fabric with the height and width you want for the dress skirt .
Fold in half the rectangle of paper or fabric.
Draw the belt, the skirt of her dress.
Check the folds of 10 cm, taking into account that the more open more volume does.
Draw the dress background.
Draw the side skirt dress.
Cut a rectangle of fabric with the height and width you want for the bond. CHILD DRESS SEWING Sew the dress shoulders. Sew the dress trunk side. Shot armhole and neckline with bias tape. Sew the side Dress skirt and leave an opening in the back for closure / zipper or buttons. Form the dress skirt folds. Preach the body to the skirt. Preach the latch. Make sheath dress with handkerchief hem. Nail loop. This model looks good with cloth / fabric in silk, mesh, cotton, organza, satin and all tissues that have good fit. 2 of fabric is needed. Off 5% (eg in a subway 5 cm off). It takes two or a tissue heights as the width of the piece.
8. CHILD DRESS
STEP BY STEP DRESS TEMPLATE
Cut a rectangle of fabric with the height and width you want for the back and dress fronts.
Fold in half the rectangle.
Leave 2 cm for trespass to the back.
Draw the neckline, the fronts and backs, with the height and width you want.
Draw the shoulder.
Draw the cava.
Design and check the value of the trunk background to the measure you want.
Draw the height at the front and back.
Draw the side, add the bottom of the blouse digs.
Draw a circle two lines to the frill / frill.
Cut a rectangle of fabric with the height and width you want to quit.
Draw online curve . Strap
Draw the dress background.
Draw the side, add the bottom of the dress strap. Note: This model looks good with cloth / fabric in silk, mesh, cotton, organza, satin and all tissues that have good fit. It needs two meters of fabric. Off 5% (eg in a subway 5 cm off). It takes two or a tissue heights as the width of the piece.
9.

10.

11.

12.

13.

14.

15.

16.

17.